HOW TO WRITE A CHILDREN’S BOOK IN 9 EASY STEPS

Have you ever wondered how to write a children’s book, and if you have what it takes to create one?
For me, it’s this smile. That’s my reason for writing children’s books.
Many aspiring (and even accomplished) authors dream of writing a children’s book.
Maybe you have an incredible idea that you can’t stop thinking about. Or maybe you want to put to paper your little one’s favorite bedtime story–the one you made up while snuggling together. Whatever the reason, now is the time to check this dream off your bucket list.
Writing and publishing your own children’s book is no longer difficult to do, nor is it financially unattainable. You could spend half a fortune just figuring out how to go about all the steps involved, but this article will save you tons of moola and loads of headaches.
Unless you’re a celebrity or have a large following already, self-publishing your children’s book is a great way to get your foot in the door, even if your ultimate goal is to get published the traditional way. If you present a well-performing book and an established author platform, your chances of landing a publishing deal are much higher than if you simply submit a query or manuscript.
In this article, you will learn:
- Exactly how to make a children’s book
- How to pick the right age group for your book
- The elements needed to make a children’s book
- How to create a book dummy
- Where to find the perfect illustrator
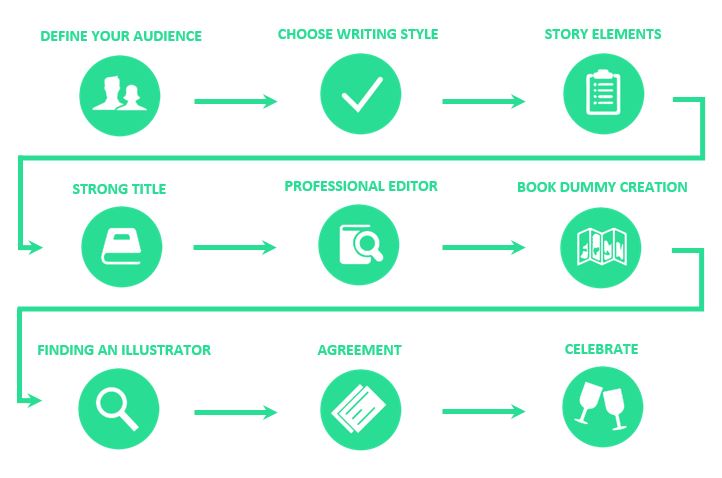
Here’s a roadmap to outline the steps we’ll take to walk through how to publish a children’s book:
STEP 1. CHOOSE YOUR CHILDREN’S BOOK FORMAT
Should you publish an ebook or paperback?
Actually, consider both.
While ebooks are not the largest medium used by smaller children and their parents yet, its usage has consistently grown. Most parents still prefer their kids to read print books, but the number of parents who prefer ebooks or who have no preference is increasing.
Ebooks also come in handy during promotions and review requests. Giving away ebook review is a lot easier and more cost-effective.
STEP 2. WRITE A BOOK FOR CHILDREN, NOT ADULTS
You may be tempted to think that writing for kids is similar, if not the same, as writing for grown-ups. This couldn’t be further from the truth, as both the style and type differ greatly.
Australian author Mem Fox sums it up perfectly:
“Writing a picture book is like writing ‘War and Peace’ in Haiku.”
You may be an excellent writer, an engaging blogger, maybe even an already accomplished author of adult fiction or nonfiction. But when it comes to writing for children, we have to adopt a new mindset and put ourselves in the shoes of those we want to write for.
Children’s books cover many years of our little ones. These are the years they develop cognitively the most, so each stage requires a different structure and setup of our books. Adapting to each stage and its cognitive ability is important if we want our book to be meaningful, educational, and fun.
STEP 3. NARROW DOWN YOUR BOOK CATEGORY
Most children’s books fall into one of these six categories:
- Board books
- Picture books
- Trade books
- Chapter books
- Middle grade chapter books
- Young Adult books
The division is mainly based on the targeted age group, the average number of pages, the number of images, and the overall word count.
Below is a table to show these average statistics for the most common types of children’s books:
| Category | Age | Word Count | Pages | Illustrations |
|---|
| Picture Book | 0-3 | 0 | 32 | Every Page |
| Young Picture Book | 2-5 | 200-400 | 32 | Every Page |
| Trade Picture Book | 4-8 | 400-800 | 32+ | Every Page |
| Picture Story Book | 6-10 | 1,000-3,000 | 32+ | Every Page |
| Chapter Book | 6-10 | 3,000-10,000 | 32+ | Almost Every Page |
| Middle Grade Book | 8-12 | 15,000-40,000 | 82 | 12+ Illustrations |
These outlined differences make your decision of which age group you are planning to write for very important, as every subsequent decision will depend on the type of book you choose to write.
It’s a great idea to find a book (or a few) similar to what you have in mind, and use the word count, number of pages, and number of illustrations as a guide for your own book.
The website
Renaissance (for teachers) is a great resource for researching the word count of published books.
A great way of figuring out what is trending in children’s books, and how much money one could make, is using
KDP Rocket. Just type in a children’s book idea and you can quickly see how many people are searching for those books on Amazon, the average amount of money made by the top books, and even the competition:
As you can see, some kids book genres have decent money coming into them, with less competition. So, make sure you do your research before hand and see what possible types of kids books you can create.
STEP 4. REALLY GET TO KNOW YOUR TARGET AUDIENCE
Writing for children brings a completely new set of challenges–something an author for grown-up fiction and nonfiction doesn’t have to be concerned about.
In essence, the book will have to appeal to two completely separate and different groups of people:
- The children that consume the book, and
- The grown-ups that purchase and read the book with their kids
The age of the main buyer of children’s books is between 30 and 44. Females make up more than 70% of these buyers.
A few ways you could really get to better know your audience are:
- Spend time with age groups you’re targeting
- Talk to parents and teachers
- Give a survey to women within the target age range from your own social circles
Remember, your book will have to please parents and teachers just as much as children.
To learn more about children’s books and their unique setup, you could:
- Study books that fall into your targeted age group. What is the general layout?
- What vocabulary is used?
- Visit a bookstore or library and browse through the kids’ section to get a feel for this genre.
- Search for age group trends and consumer trends in general via sites like Slideshare
- Or frequent the US Census that provides detailed demographic data.
Why am I telling you all of this? I believe that setting this very basic foundation of knowledge on the differences of audiences will set you miles and miles apart from those who simply start writing a children’s book. Having a general idea about who purchases, reads, and consumes the books you’re planning to write will help you reach and address your target audience.
STEP 5. CHOOSE A WRITING STYLE (AND STICK WITH IT)
Your writing style will depend greatly on the age group you are writing for, the associated word count, the story you’re telling, and, of course, your own preferences. Here are some styles worth considering:
- RHYME: If you decide to write your book in rhyme, you need to make the rhyme very, very good. Make sure lines have the same syllable counts and rhythms. Don’t force bad rhymes or skip rhyming. Be persistent. And consistent. The Little Blue Truck and Llama Llama books are excellent examples.
- PAST OR PRESENT TENSE: Kids prefer books in the present tense, as it actively engages them in the story. They’re experiencing it as it happens, rather than being removed from something that happened in the past. If, however, you’re telling a story that is specific to a certain event or time, you might want to tell it in past tense because it’s a finite event that took place once upon a time. Maisy books are a great present-tense example.
- FIRST OR THIRD PERSON: Whose point of view is the story told from? This is one of the most important decisions an author has to make. Is the main character the central focus on every page, with everything happening to them? Is it helpful to see the events that are happening through their eyes? If yes, then the first person might be a good choice. If not, a third person narrator’s voice may give you more freedom and flexibility.
There is no right or wrong approach; it’s simply a question of style. Once you have chosen your style, however, you will need to stick to it throughout the book.
STEP 6. INCLUDE IMPORTANT ELEMENTS OF A CHILDREN’S BOOK STORY
Your unique and inspired story idea is only as strong as the way in which you tell it. Good stories are carefully designed and tend to be simple.
It’s all about composition. There’s a beginning, a middle, and an end. There are actions, scenes, and emotions. And be sure to be clear about your core message.
As mentioned in my book How To Self-Publish A Children’s Book, the elements aren’t always the same, but here are the five most often used:
- Unforgettable characters: The best characters have strong personalities, make bold moves, and go after their dreams against all odds. Children fall in love with them and want to be like them. Children want to be able to relate to the character in some way. Almost every person has felt like an outsider or has had their morals questioned. In general, they also relate to kids that are just a bit older than them. Characters who remind kids of themselves are the most memorable.
- Suspenseful action/hook: Many authors shy away from beginning their story with an action, such as a shocking or unexpected event, but this is a very effective way to draw in young readers. Consistent action throughout your story is key, as it will hold the reader’s attention. Chapter books, for example, usually end each chapter with a cliffhanger, to ensure the reader keeps turning the pages.
- Realistic dialogue: Children like to read stories that sound like they talk. Listen to conversations you hear around you; none of them will sound like the nicely flowing, full sentences you learned to write in school. Make sure you’re using age-appropriate language that kids will understand and relate to. If you are unsure about the language level of your target audience, be sure to spend time with kids of that particular age. Go to libraries, visit friends with kids, or simply read children’s books to get a feel for the language used.
- Storyline: Be sure to provide obstacles and challenges for your characters; some sort of escalation. Also, note that little ones like happy endings and a solution to a problem. If your story lacks a happy ending, you risk upsetting the reader or leaving them dissatisfied.
- The instant recall factor: You want your book’s character to remain in the minds of your little readers long after they’ve read your book. If kids ask to read it over and over again, you can consider your story a success.
While the sequence and rhythm of events is very important, please keep in mind that not all stories have the same structure. There is no one formula because following a formula would rob stories of their true potential. Yes, it’s important to have an intentional structure, but if it doesn’t fit, don’t force it.
STEP 7. TITLE YOUR CHILDREN’S BOOK
Once your story is written, it’s time to think about a winning title for your children’s book!
You may already have a title for your book in mind. In fact, it’s probably something you’ve been thinking long and hard about for some time.
Yes, we want a clever title that lets your story’s personality shine through. But something we want just as much (if not more) is for readers to actually find your book! And this will be very hard to do if you don’t name it properly.
STEP 8. DO I NEED AN EDITOR FOR A CHILDREN’S BOOK?
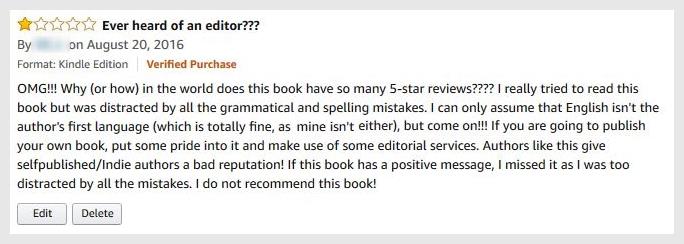
Editing is a valuable investment. A good editor is instrumental in making your book a success because poor spelling, grammar, and book structure will reflect badly on your book’s sales and reviews.
Your book and its message might be amazing, but if too many errors slip through, your readers will notice and voice their opinion in a review like this, which ultimately will lower your overall rating.
If your book is more than 600-800 words long, you should send it off to a professional editor for proofing. Yes, you can go over it yourself and let your significant other read through it. But letting a third unbiased, independent, and professional party look over it will make your manuscript so much better, given you have an experienced editor.
STEP 9. ILLUSTRATE YOUR CHILDREN’S BOOK
When it comes to illustrating your children’s book, there are three options you can choose from. The best option for you will depend on your budget, time, skill level, and trust you’re willing to put into someone else’s interpretation of your story.
Your choices are:
- Do it yourself
- Hire someone
- Combination of both
Next, you’ll need to…
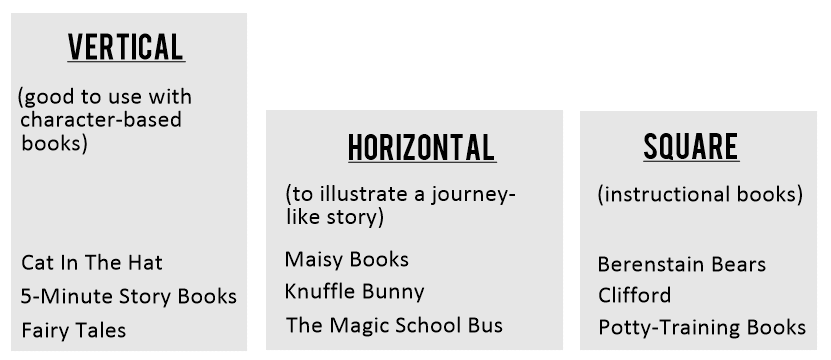
1. DECIDE ON THE BOOK’S ORIENTATION:
When it comes to picture books, there are a number of different orientations to choose from. (These don’t apply to chapter books or books for older children, as those usually feature the 5½” x 8” format.)
There is no set rule, of course. Rather, it’s an oversimplified observation.
This decision needs to be made early on because your illustrations will depend greatly on the orientation you choose for your book.
2. PLAN YOUR IMAGE SIZING
Whether you hire an illustrator or create the illustrations yourself, you’ll want to make sure you do the sizing correctly so that once you upload your artwork, everything runs smoothly.
CreateSpace’s available print sizes will depend on whether your book is going to be in color or black and white. Below are the most common sizes.
- 5.5” x 8.5”
- 6” x 9”
- 6.14 x 9.21”
- 7” x 10”
- 8” x 10”
- 8.5” x 8.5”
- 8.5” x 11”
If you plan on having your images cover the entire page, make sure to add 0.125 to the top and bottom, as well as one side to account for trimming. CreateSpace offers templates
here, but remember that you’ll still have to add the bleed allowance yourself.
Here is a quick example from my book The Little Mower That Could. Let’s say you want your book to be 8.5” x 8.5”:
- Add 0.125 to the top, bottom, and one side
- Image size with bleed should be 8.63” x 8.75” (w x h), (or 2589 pixels x 2625 pixels at a resolution of 300 pixels/inch)
- *This is only necessary for interior pages if the art covers the ENTIRE page
The larger your image, the better – at least 2,500 pixels per side, preferably larger. Take printing into account. For example, if your book will be 11” on one side, your images need to be more than 3,300 pixels per side. Just make sure the aspect ratio remains the same if you should decide to resize your images.
Here’s a great
Inches-to-Pixels and
Pixels-to-Inches converter so you know how large your image should be depending on your selected trim size. Be sure to select a DPI (Dots Per Inch) of 300.
3. CREATE A STORYBOARD / BOOK DUMMY
How do we decide what to include in the illustrations on each page?
And how can we make sure the images match up with the text?
That’s where a storyboard or book dummy comes in.
There are many different ways to use this technique, and I’ll share what works best for me:
For picture books, I usually like to work backward. Now that you’ve written your story, this will be easy to do.
Remember – this is not the final layout. This is just meant to help you determine which illustrations you would like to include so that you can get ready to find and hire an illustrator. This step is also helpful if you are planning to create your illustrations yourself.
- You already know how many pages your book will have. You’ll use this information to evenly distribute the text throughout that number of pages. Let’s say you have 32 pages (15 double-page spreads plus 2 single pages). It’s helpful to create an actual dummy to help us with the next steps. Here’s how:
- Print out your manuscript and divide the text into 15 parts.
- Cut and paste them into the book dummy you created, one part per double-page spread.
- Flip through each page, read your pasted text, and think of an illustration that would go nicely with that particular text
- Start sketching on the page opposite to your pasted text.
This storyboard creation process doesn’t have to be perfect. You just want to get the essence of the story right, so be loose and expressive, and have some fun. In the end, you’ll probably create a few different versions, each being an improvement of the previous one.
4. CHOOSE TEXT AND ILLUSTRATION COMBINATIONS
How you combine your text and illustrations is really a design question and completely up to you. But because the creation process depends on your chosen combination, you will have to decide in advance so you can let your illustrator know.
There are two ways of combining text and illustrations:
- Text as part of the image
- Text and image separate
TEXT AS PART OF THE IMAGE:
Having the text in the image itself makes formatting much easier, as you don’t have to worry about page breaks or font sizes. It will also look consistent across different devices.
I usually use this method for my full-color children’s books. You can use whatever font you want, and the text can go anywhere on the page, making it fun and engaging for little ones’ eyes.
Below (left) is a page from my book The Garbage Trucks Are Here, and on the right is a page from my book A Gemstone Adventure. Here, I have added a layer underneath the text to make it stand out from the background.
If you decide to include the text in the image itself, this will have to be done by your illustrator. Or, if you feel your skills are up to it, you can add the text yourself once you receive the finished images, using simple graphics software.
Bear in mind that this method does make editing the text a bit harder – any changes or corrections have to be made within the image itself.
TEXT AND IMAGE SEPARATE:
The other option is to have the images and text separate, with the text either below the illustration or on a separate page. Below is a double-page spread from my chapter book series The Amulet Of Amser. It has an image on the left-hand page and the text on the right-hand page.
Here, the layout would be arranged by the book formatter (or yourself) and does not involve your illustrator.
5. CHOOSE AN ILLUSTRATOR
Here’s a short list of outsourcing sites where you can find an illustrator for your book:
Social media sites (children’s book specific):
The outsourcing sites mentioned above are great for multiple reasons. First, most provide you with reviews from the artist’s previous clients. Some even include information about previous completion rates (something I really pay attention to).
And most importantly, these sites are cost-effective. You have to weed through the profiles a bit, but if you find the perfect illustrator who offers the style you’re going for, the research will be worth it.
HOW TO POST YOUR PROJECT
On most outsourcing sites mentioned above, you will need to post your project (similar to a job offering), and illustrators will then bid on it.
In order to get an idea of how much you should be offering, browse some of the platform’s current projects. Know that your bid sets a baseline only, as each illustrator will bid individually on your project if he or she is interested in working with you.
Bonus: To get you started with your illustrator search, I’ve created swipe files that you can use to post your Illustrator Project Description into any of the previously suggested sites. You can download it
here
After the initial bidding process (usually a couple of days), you will have to go through each illustrator’s profile and portfolio to decide who would be a great fit. The first time you go through this weeding-out process, you’ll eliminate those you don’t plan on hiring.
To see if an illustrator is a great fit, I recommend you go through a vetting process.
- Look at their profile and read through previous reviews
- View their portfolio to get a feel for their style
- Request a sample of their work so you can see how effectively they can turn your writing into illustrations, and how well they follow instructions. To view an example of such a request, click here.
6. PAYING FOR ILLUSTRATIONS
In order to get a feel for acceptable prices for a project, I recommend browsing the outsourcing site to find postings for similar projects. I’m refraining from including actual prices, as those differ greatly from service provider to service provider, and also change over time.
When hiring an illustrator via one of these outsourcing sites, payments are generally released based on milestones that you get to set. For example, you may release the first milestone payment after the storyboard has been submitted. The milestone setup will depend on the scope of your project and the platform you are using to hire your illustrator.
The cost of your illustrator depends on multiple things:
- Number of illustrations – the more you need, the more you’ll pay.
- Complexity of the artwork – using watercolors will be more time consuming and cost more than purely digitized images, for example. The simpler your illustrations, the more you’ll save.
- Illustrator’s skill level and experience
- Location of the illustrator -usually, artists located in Western Europe, the U.S., Canada, and Australia will charge more than artists in Asian or Eastern European Countries
- Delivery speed – the more quickly you require your artwork, the more it generally costs to move you up in the illustrator’s drawing queue.
7. AGREEING TO WORK TOGETHER
Once you select the best-fitting illustrator for your project, you’ll want to make sure to request the following:
- Signed art release form. This will only be relevant if you decide to hire an illustrator directly. Any art attained via the outsourcing sites listed above should already provide that any commissioned work will automatically become the intellectual property of the buyer.
- High-resolution images (300 dpi) with the proper sizing.
- Raw files of all image. This will enable you to make changes directly to your illustrations.
AND THAT’S HOW TO WRITE A CHILDREN’S BOOK
There you have it! Follow this guide and you will have a beautiful story tailored toward your audience AND the illustrations to go along with it.
Children value creativity and individuality. There is no one way to draw. No one way to paint. No one way to write. It’s about being uniquely you, lending your unique voice to your unique story.
That’s why you shouldn’t be afraid of the way YOU write and YOU draw because that’s what sets you apart. Diversity is important. Tell YOUR story.
I hope you derived tons of value on how to make your children’s book.
If you’d like to expand your knowledge on how to:
- Format Your Paper & Ebook Versions of Your Book Step-by-Step
- Publish Your Paperback and Ebook, and
- Market Your Freshly Published Children’s Book
ABOUT THE AUTHOR: EEVI JONES

Eevi Jones is the author of more than a dozen children’s books, and founder of
EEscribe, a writing and marketing resource for aspiring children’s book authors.
She has been featured in multiple media outlets, such as TEDx, Scary Mommy, Huffington Post, EP Magazine,
Military.com, and Stars & Stripes.